
Imagine you're a developer tasked with building an AI-powered application that can answer questions based on information from a specific website. Chances are, you've come across Langchain - a popular library known for its versatility and wide range of capabilities. With Langchain, you can easily integrate various AI components into your application, from data ingestion and processing to model training and inference. It's a go-to choice for many developers looking to create chatbots, RAG systems, or AI agent applications.
However, there's another tool worth exploring: Graphlit. Graphlit offers a compelling alternative for developers seeking a more streamlined approach to building AI applications. In this article, we'll dive into the key differences between Langchain and Graphlit, exploring their respective strengths and trade-offs, and helping you make an informed decision for your next AI project.
Overview of LangChain and Graphlit
At its core, Langchain follows a modular architecture, providing a set of loosely coupled components that developers can mix and match to create custom AI pipelines. This allows for great flexibility and control over every aspect of the application, from data loading and preprocessing to model selection and deployment. Langchain's ecosystem includes modules for web scraping, text splitting, embeddings, vectorstores, and integrations with various LLM APIs and LLM services.
In contrast, Graphlit takes a more opinionated and integrated approach, offering a unified platform that abstracts away many of the low-level details and vendor wiring you would have to do with LangChain. With Graphlit, developers can quickly set up data feeds, define AI workflows, and configure models using high-level APIs. The platform handles the underlying data processing, storage, and model orchestration, allowing developers to focus on the application logic and user experience.
While Langchain's modular design offers many customization options, it also means that developers need to have a deep understanding of the various components and how they interact. This can lead to a steeper learning curve and longer development cycles, especially for complex applications. Graphlit, on the other hand, prioritizes simplicity and ease of use, trading off some flexibility for a more manageable and productive developer experience.
Throughout this article, we'll explore these differences in greater detail, examining how Langchain and Graphlit approach data ingestion, processing, storage, and retrieval, as well as their integration capabilities with AI models and external services. We'll provide concrete examples and code snippets to illustrate the key concepts and help you understand the implications for your specific use case.
Whether you're a seasoned AI developer looking for a more efficient workflow or a newcomer seeking a gentle introduction to building AI applications, this comparative analysis of Langchain and Graphlit will provide valuable insights and guidance. By the end of the article, you'll have a clear understanding of the strengths and limitations of each library, empowering you to make the best choice for your next AI project.
Building a Question-Answering System with Langchain
Let's build a question-answering system using Langchain. We'll go through the code step by step, explaining each component and how it fits together to create the final application.
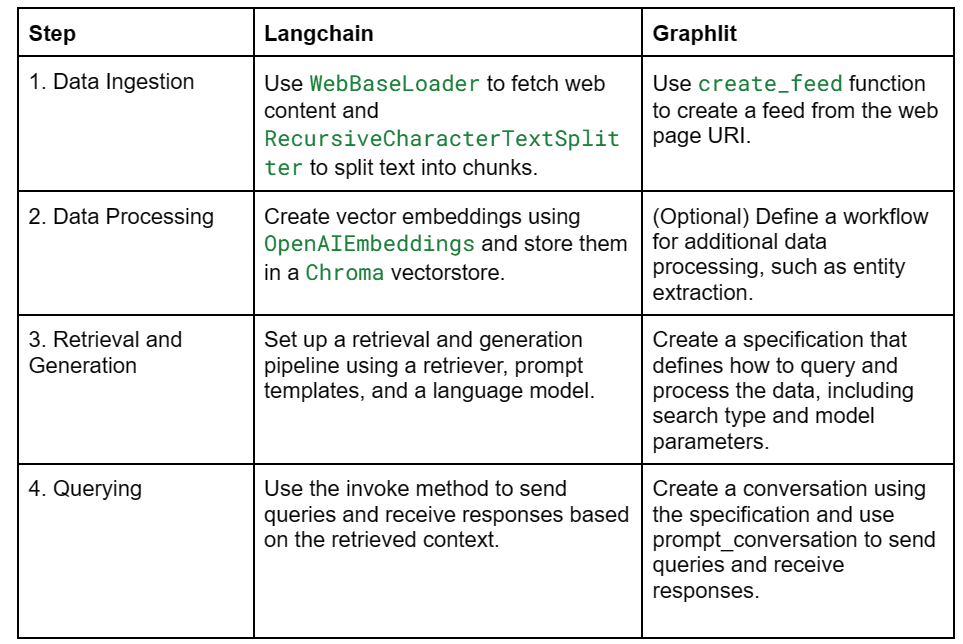
Step 1: Loading and Processing Data
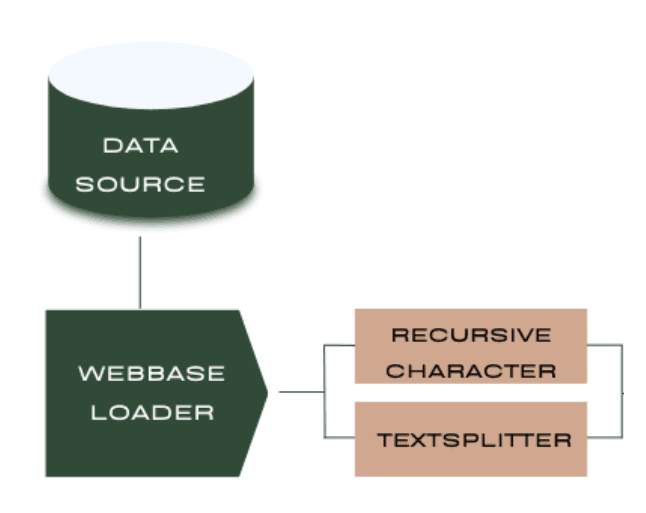
The first step is to load and preprocess the data that our system will use to answer questions. In this example, we're using a single web page as our data source.
loader = WebBaseLoader(
    web_paths=("https://lilianweng.github.io/posts/2023-06-23-agent/",),
    bs_kwargs=dict(
        parse_only=bs4.SoupStrainer(
            class_=("post-content", "post-title", "post-header")
        )
    ),
)
docs = loader.load()
Here, we use Langchain's WebBaseLoader to fetch the content of the specified web page. The bs_kwargs parameter allows us to select specific elements from the page using BeautifulSoup's SoupStrainer. In this case, we're interested in the elements with classes "post-content", "post-title", and "post-header".
Next, we split the loaded documents into chunks using the RecursiveCharacterTextSplitter:
text_splitter = RecursiveCharacterTextSplitter(chunk_size=1000, chunk_overlap=200)
splits = text_splitter.split_documents(docs)
This splitter breaks down the text into smaller chunks of a specified size (1000 characters) with some overlap between chunks (200 characters) to maintain context.
Developers have several options for hosting the data loading and processing components. They can run these tasks on their local machine separately, use a cloud-based virtual machine (like AWS EC2 or Google Compute Engine), or even employ serverless functions (such as AWS Lambda or Google Cloud Functions) for a more scalable and cost-effective solution.
However, each of these options comes with its own set of challenges. Running on a local machine may not be suitable for production environments, and developers need to ensure proper security measures are in place. Cloud-based VMs require managing infrastructure, scaling, and maintenance. Serverless functions have limitations in terms of execution time and memory, which may not be suitable for all use cases.
Step 2: Creating Vector Embeddings and Storing in a Vector Store
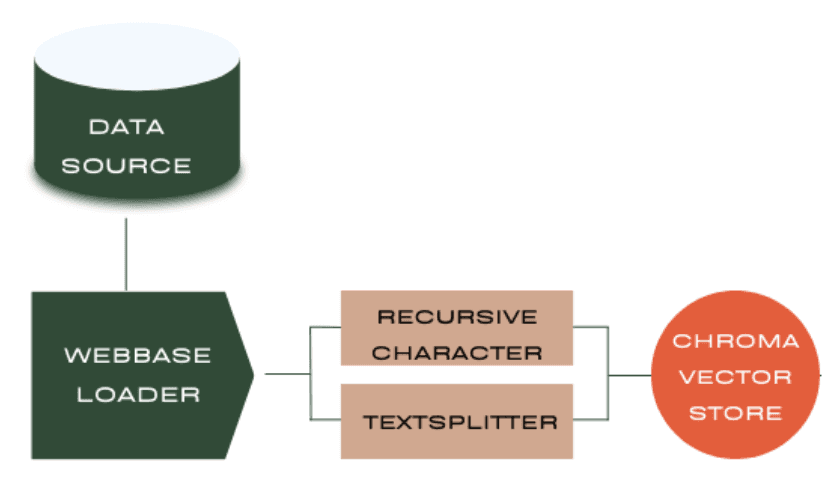
To enable efficient retrieval of relevant chunks based on a given query, we need to convert the text chunks into vector embeddings and store them in a vectorstore.
vectorstore = Chroma.from_documents(documents=splits, embedding=OpenAIEmbeddings())
Langchain provides various embedding and vectorstore implementations. In this example, we use OpenAIEmbeddings to generate embeddings and Chroma as our vectorstore. The from\_documents method takes care of creating embeddings for each chunk and storing them in the vectorstore.
Vectorstores are specialized databases designed to store and efficiently retrieve vector embeddings. Popular options include Pinecone, Weaviate, Qdrant, and Milvus. These vector stores can be hosted on their respective managed platforms (like Pinecone Cloud) or self-hosted on your infrastructure.
Choosing and managing a vector store adds another layer of complexity to the application architecture. Developers must consider factors like scalability, performance, cost, and integration with other components. Each vectorstore has its own API, query language, and deployment process, which can be time-consuming to learn and implement.
Step 3: Setting Up the Retrieval and Generation Pipeline

With our data processed and stored, we can now set up the pipeline for retrieving relevant chunks based on a query and generating an answer using a language model.
retriever = vectorstore.as_retriever()

prompt = hub.pull("rlm/rag-prompt")

rag_chain = (
  {"context": retriever | format_docs, "question": RunnablePassthrough()}
  | prompt
  | llm
  | StrOutputParser()
)
The pipeline consists of several components:
retriever: Retrieves the most relevant chunks from the vectorstore based on the query.format\_docs: A custom function that concatenates the retrieved chunks into a single string.prompt: A pre-defined prompt template that takes the context (retrieved chunks) and the question as inputs.llm: The language model (in this case, gpt-3.5-turbo-0125) that generates the answer based on the formatted prompt.StrOutputParser: Parses the generated output into a string.
Language models like GPT-3.5 and GPT-4 are typically hosted by their respective providers (OpenAI, Anthropic, etc.) and accessed via APIs. Developers need to manage API keys, rate limits, and billing. Some models can also be self-hosted using open-source implementations like GPT-J or BLOOM, but this requires significant computational resources and expertise.
Integrating with external LLM APIs adds another point of failure and dependency to the application. Developers need to handle authentication, error handling, and API versioning. Self-hosting models is not practical for most use cases due to the high costs and maintenance overhead.
Step 4: Querying the System
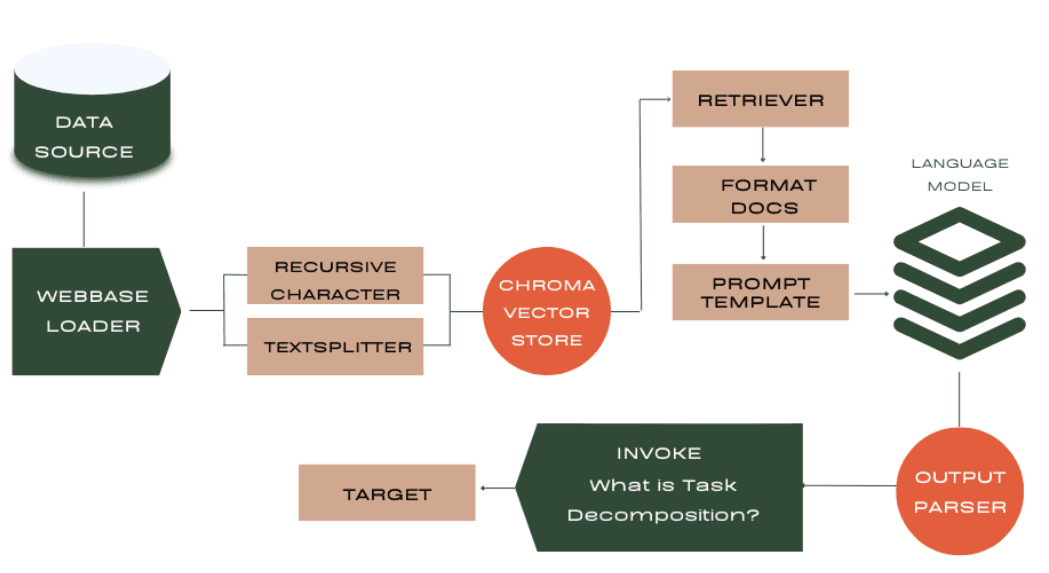
Finally, we can use the rag_chain to ask questions and get answers based on the information in the processed web page.
rag_chain.invoke("What is Task Decomposition?")
And there you have it! A complete question-answering system built with Langchain. The modular architecture allows for easy customization and experimentation with different components, while the high-level APIs abstract away much of the complexity.
However, as we've seen, building an AI application with Langchain involves managing various components across different platforms and providers. This can add significant overhead and complexity, especially for developers who are new to this ecosystem; which is why we will be looking into Graphlit. In contrast, Graphlit offers a unified platform that abstracts away many of these concerns. By providing a fully managed, end-to-end solution for building applications, Graphlit allows developers to focus on their core application logic rather than worrying about infrastructure, integration, and management challenges.
Developers need to consider factors like:
- Infrastructure management: Provisioning and scaling VMs, containers, or serverless functions for data processing and model hosting.
- Integration: Ensuring smooth communication and data flow between different components, APIs, and services.
- Security: Managing API keys, access controls, and data encryption across multiple platforms.
- Monitoring and logging: Setting up centralized monitoring and logging to troubleshoot issues and monitor performance.
- Cost optimization: Analyzing and optimizing costs across various services, considering factors like data transfer, API calls, and compute resources.
In the next section, we'll explore how Graphlit approaches the same task and compare the two libraries regarding ease of use, flexibility, and performance.
Building a Question-Answering System with Graphlit
Step 1: Creating a Feed
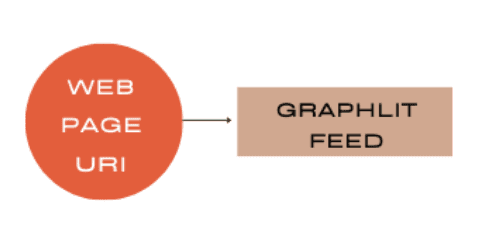
The first step is to create a feed from the web page we want to use as our data source. Graphlit provides a high-level create\_feed function that takes care of fetching and processing the web content.
async def create_feed(graphlit, uri):
    input = FeedInput(
        name=uri,
        type=FeedTypes.WEB,
        web=WebFeedPropertiesInput(
            uri=uri
        )
    )

    try:
        response = await graphlit.client.create_feed(input)

        feed_id = response.create_feed.id
    except GraphQLClientError as e:
        return None, str(e)

    return feed_id, None
We simply provide the URI of the web page, and Graphlit handles the rest, returning a feed\_id that we can use to reference the feed later.
Step 2: Creating a Specification

Next, we create a specification that defines how we want to query and process the data in our feed. This includes specifying the search type, model to use for question-answering, and other parameters.
async def create_specification(graphlit):
    input = SpecificationInput(
        name="Summarization",
        type=SpecificationTypes.COMPLETION,
        serviceType=ModelServiceTypes.ANTHROPIC,
        searchType=SearchTypes.VECTOR,
        anthropic=AnthropicModelPropertiesInput(
            model=AnthropicModels.CLAUDE_3_HAIKU,
            temperature=0.1,
            probability=0.2,
            completionTokenLimit=2048,
        )
    )

    try:
        response = await graphlit.client.create_specification(input)

        spec_id = response.create_specification.id
    except GraphQLClientError as e:
        return None, str(e)

    return spec_id, None
Graphlit provides a declarative way to define the specification, which makes it easy to understand and modify.
Step 3: Creating a Conversation and Querying
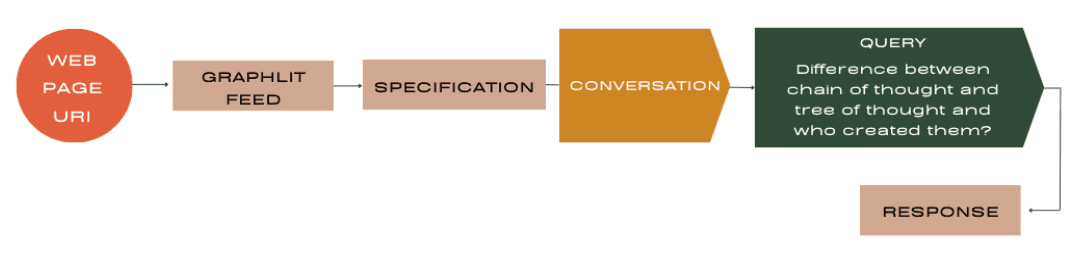
Finally, we create a conversation using the specification and querying the data in our feed.
async def create_conversation(graphlit, spec_id):
    input = ConversationInput(
        name="Conversation",
        specification=EntityReferenceInput(
            id=spec_id
        )
    )

    try:
        response = await graphlit.client.create_conversation(input)

        conv_id = response.create_conversation.id
    except GraphQLClientError as e:
        return None, str(e)

    return conv_id, None

async def prompt_conversation(graphlit, conv_id, prompt):
    response = await graphlit.client.prompt_conversation(prompt, conv_id)
    message = response.prompt_conversation.message.message
    citations = response.prompt_conversation.message.citations
    return message, citations
We create a conversation with a name and the specification ID and then use the prompt_conversation function to send queries and receive responses.
And that's it! With just a few lines of code and a streamlined architecture, we have a fully functional question-answering system using Graphlit.
Compared to Langchain, Graphlit's architecture is more compact and abstracts away many of the low-level details. We don't need to worry about chunking text, creating embeddings, or managing a vector store - Graphlit handles all of that internally.
This makes Graphlit an attractive option for developers who want a simpler, more integrated solution for building AI applications. While it may not offer the same level of customization as Langchain, it provides a powerful set of high-level APIs and a managed infrastructure that can accelerate development and reduce operational complexity.
Comparison
As we can see, both Langchain and Graphlit provide powerful tools for building AI applications, but they take different approaches in their architecture and design.
Langchain offers a modular framework where developers have fine-grained control over each component of the pipeline, from data ingestion and processing to retrieval and generation. This flexibility allows for extensive customization and optimization, but it also requires a deeper understanding of the underlying technologies and how they fit together.
On the other hand, Graphlit provides a more integrated and abstracted solution, where many of the low-level details are handled automatically by the platform. Developers can focus on defining high-level specifications and workflows, and Graphlit takes care of the rest. This simplifies the development process and reduces the operational complexity, making it an attractive option for teams looking to quickly prototype and deploy AI applications.
Ultimately, the choice between Langchain and Graphlit depends on the specific needs and requirements of the project. If maximum flexibility and customization are paramount, Langchain may be the better choice. But if simplicity, ease of use, and rapid development are the top priorities, Graphlit offers a compelling alternative.
Appendix
Step 1a: Creating a Workflow (Optional)
Graphlit allows you to define workflows for additional data processing, such as entity extraction. This step is optional, but it demonstrates the flexibility of Graphlit's architecture.
async def create_workflow(graphlit):
    input = WorkflowInput(
        name="Azure Cognitive Services",
        extraction=ExtractionWorkflowStageInput(
            jobs=[
                ExtractionWorkflowJobInput(
                    connector=EntityExtractionConnectorInput(
                        type=EntityExtractionServiceTypes.AZURE_COGNITIVE_SERVICES_TEXT,
                    )
                )
            ]
        )
    )

    try:
        response = await graphlit.client.create_workflow(input)

        workflow_id = response.create_workflow.id
    except GraphQLClientError as e:
        return None, str(e)

    return workflow_id, None
Here, we define a workflow that uses Azure Cognitive Services for entity extraction. Graphlit takes care of orchestrating the workflow and integrating with the external service.
Summary
Please email any questions on this article or the Graphlit Platform to questions@graphlit.com.
For more information, you can read our Graphlit Documentation, visit our marketing site, or join our Discord community.